This is Part 3 of a 4 Part Article.
Part 1 covers assembling the hardware
Part 2 covers provisioning the Raspberry Pi with Software
Part 3 covers Final Configuration of the hotspot
Part4 is Frequently Asked Questions
Set up your Hot Spot
Everything if it has gone well is setup and should be running. To make sure that the system and software is initialized and synchronized at this point you should reboot the system. If you are using a Raspberry Pi Model 1 (any variant) instead it’s best to install the WiFi dongle. Model 1’s had only two USB ports rather than 4. The Model 1’s did not have as well designed power supply as the model 2, 3, or Zero, and so every time you put a device on the USB Bus it caused a power drop in the main supply bus which would cause the Model 1 to reboot. If you just pull the power on any Raspberry Pi it may cause a glitch during a file I/O and the OS is writing to the files any time it needs to, so you may not be aware. Pulling power abruptly may damage your µSD Card (Remember that is the Pi’s Disk Drive). While all it takes is to rewrite it again, you will lose any work between the last backup of the card.
The safest way is to shutdown the Model 1’s before putting any device on its USB Bus. This is best done as follows from the SSH console on your Laptop/Desktop:
- sudo shutdown -h
If you are using a model 2 or a model Zero without WiFi, now is a good time to put in your WiFi Dongle.
If you are using a Model 2, 3, or Zero, from your SSH console on your Laptop/Desktop enter:
- sudo reboot
When the system reboots, this may take anywhere from 30-40 seconds to 2 minutes, go grab a cup of coffee and relax, we have done the hard parts. If you can’t wait watch the green activity light on the circuit board, not the RJ-45 Connector, when it stops flashing vigorously the system is mostly booted. The Pi Finder screen on your Laptop/Desktop should have reset to this:
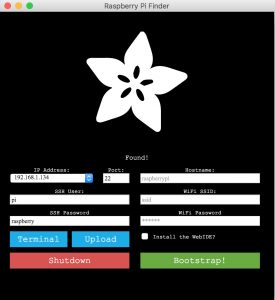
No need to open an terminal session, but you can if you want, just incase you have some tweaking to do. When the terminal window opens with the command prompt the system is booted. Or you can close the Pi Finder window it’s your choice.
Make sure the system you are now running on is still on the same network as the Raspberry Pi. Then open a browser and enter:
- http://pi-star.local/admin
If a window opens go to the Configure the Pi-Star Hotspot Section. Otherwise:
If you get a server not found, or other error, you may not have the Bonjour software active on your the system you are trying to access the Raspberry Pi with.
On a windows machine, you can download Bonjour & Quicktime (Apple Computer’s system locator, MP4 Video Player) from for free from Apple.
A MacOS machine should have it already installed, IOS has had software functions since IOS 4.0, and Android since JellyBean 4.1, however, they may not be active. If that is the case a free app called Fing is available on both IOS and Google Play that will implement the nmap scan function and reveal the IP address of the pi-star server. Then you can access it as described with Angry IP Scanner below.
If you are on a Linux Machine it can be loaded with:
- sudo apt-get install avahi–daemon netatalk -y
It was already installed on the Raspberry Pi when you pushed the Bootstrap Button. If you don’t want to install this software on your thin client machine, (makes life a bit easier, but not required) you will need to know the IP address of your pi-star server. A highly recommended utility for your Laptop/Desktop is a freeware graphical nmap derivative called Angry IP Scanner which will scan the local network you are on and report the IP Address of all devices it finds on the network. This can be very useful in trouble shooting your network. As mentioned above a similar piece of software called Fing will run on mobile devices. After you have determined the IP Address of the Pi-Star Server (computer) enter:
- http://<ipaddress>/admin Example: http://192.168.0.132/admin
Configure the Pi-Star HotSpot
The default user name: pi-star
The default password: raspberry
If you changed either of the above substitute your user name/password. After you have hit return on the local web address of the hotspot, the browser indicator will spin/flash for a short while, and then a window will open stating No Mode defined. If you don’t see that you have some sort of network problem, or the web server is not running. Ensure that both the system running the web browser and the Raspberry Pi are on the same network. If they are you may try rebooting the Raspberry Pi. If that still fails, there are so many possibilities, I can only reference you to the pi-star support pages located on Facebook and the Wiki. Failing that recheck the steps to this point to ensure you encountered no errors getting here. I will continue assuming everything is fine and your browser opens to the page shown below.
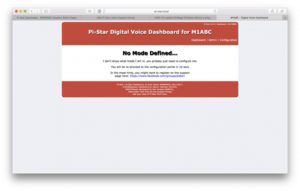
After 10 seconds or so, you will see the a page asking you to sign in. Use the appropriate username and password. After they are entered, the initial configuration page will open
At the top of the page is the Pi-Star Banner, the broad red stripe. In the lower right corner of the banner are links to various functions in the program.

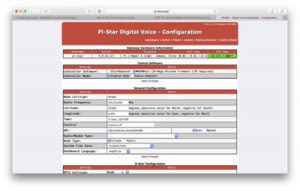
Select “Configuration”and the following page will open:
Begin configuring your hotspot Your choices may vary from the items below. It’s your HotSpot and your choices:
- Select MMDVMHost
- Select Simplex Mode
- Under MMDVMHost Configuration Select the modes you want to run. I was advised not to select more than two, since the processing of packets can get a little jittery if you select more. However YMMV (Your mileage may vary). I selected DMR & D-Star.
- I have not created a display yet so select None
- Set Hangtime to 20 Sec
- For your URL set: http://www.qrz.com/db/<URCALL> & Auto
- Fill in your personal information
- continue on….. Some of the previous information not shown for privacy considerations but you shouldn’t need help there.
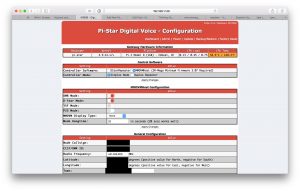
- The Radio Modem type is either
- DV-Mega Raspberry PI Hat (GPIO) — Dual Band
- Or Single band —- what you are using
Page down (Most likely the form does not all fit on the screen)
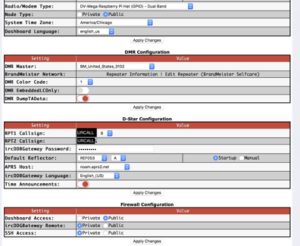
- I set the DMR Master to 3102
- color code is 1
- and DMR DumpTAData on
- My D-STAR Configuration is as above (REF053A is MN Statewide on D-STAR) You could select Manual and switch to where you want to go.
- I set Dasboard Access to Public all the rest to private
- Select Apply Changes (any of the buttons on the page will save configuration information you have entered so far and you will see:
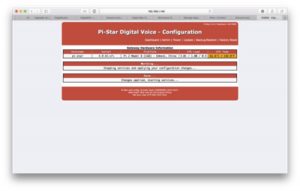
Now we need to set up the WiFi Connection.
- Make sure you are on the Configuration Page.
- Turn on your portable WiFi HotSpot or Dongle, make sure it is hooked to the internet.
- make sure that the WiFi Dongle is attached or the Pi3’s WiFi is active
- On the banner, of the Configuration Page is a selection marked “Power”, select it
- a new screen will open giving you the choice of “shutdown” or “restart”
- select “restart”.
- After the Pi Boots again (between 40 sec and 2 minutes)
- the system should automatically go to the Dashboard Page
- If it doesn’t type into your browser http://pi-star.local/admin or its ip address as before
- after you most likely will not have to sign in
- If the sign in window appears do so
- select Configuration from the Banner Menu
- page down on the Configuration page to the “Wireless Configuration Section”
- select the Configure WiFi Button
- The screen will open up and you can select “Scan for Networks”
- The system will scan and output identifiable Networks
- select the one that you will use in portable operation.
- highlight it, and choose save and connect.
- Go back to the top of the screen and select “Power” and then “Shutdown”.
- switch the DHAP Off
- This is how you should turn power off Shutdown
- then Power Off
- Just switching the unit off may destroy your µSD Card
- If you have charged up the 18650 batteries and installed them disconnect the external power
- unplug the ethernet connection
- switch the browser you plan to use to the portable internet connection you plan to use
- Switch the unit on
- After about 40 sec to 2 minutes, log into the system again if required
- If you see the Admin or Dashboard Screen set your DMR Radio to the Shark Zone and select a frequency.
- Try it out — if it works your done!
- If it doesn’t work start debugging the system.
- start with For support, please check out the
- Pi-Star Facebook Support Group: https://www.facebook.com/groups/pistar/
And the Wiki: http://wiki.pistar.uk.
- Again, I assume everything is working so we are done.
- Select admin or dashboard and you should be good to go….

. . . I am… Are You?
Continue to Part 4: Configuring the MMDVMHost Software Click Here
Leave a Reply