I thought I’d share with everyone that I’m working on the content for the code-plug clinic. Coming soon. 73 – NØNKI (Eric Osterberg) n0nki

I thought I’d share with everyone that I’m working on the content for the code-plug clinic. Coming soon. 73 – NØNKI (Eric Osterberg) n0nki
Two years ago today, Brandmeister appeared at the domain: brandmeister.network
https://brandmeister.network/?page=news&post=9
The network designed by hams for hams using completely open specifications designed to connect anything without regard for the politics.
Without Brandmeister, your hotspot would not exist. Home brew equipment would not have access to the networks. (Or maybe someone else would have done it!) I’m very thankful myself. Happy belated Thanks-Giving day!
73 – NØNKI (Eric Osterberg) – n0nki
Just a quick reminder that the bi-weekly breakfast event takes place tomorrow morning November 18th. See further down on this site for map location and other details.
If you can’t make it, I’ll see you on December 2nd or 12/16th or 12/30th.
73 – NØNKI
The earlier birds will be there at 7:30 AM (or even earlier) but the official start time is 8:00 AM.

Just a quick reminder that the bi-weekly breakfast event takes place tomorrow morning November 4th. See further down on this site for map location and other details.
If you can’t make it, I’ll see you on November 18th or December 2nd.
73 – NØNKI
The earlier birds will be there at 7:30 AM (or even earlier) but the official start time is 8:00 AM.
Below are the recommended simplex frequencies to be used with DMR in the United States and Canada. In addition to this information, please note the following radio configuration items:
Admit Criteria: Please set this to “Always”
In Call Criteria: Please set to “TXI” or “Always”
FREQUENCY BAND TALKGROUP ID TIMESLOT COLOUR CODE
441.0000 UHF 99 1 1
446.5000 UHF 99 1 1
446.0750 UHF 99 1 1
433.4500 UHF 99 1 1
145.7900 VHF 99 1 1
145.5100 VHF 99 1 1
This is Part 4 of a 4 Part Article.
Part 1 covers assembling the hardware
Part 2 covers provisioning the Raspberry Pi with Software
Part 3 covers Final Configuration of the hotspot
Part4 is Frequently Asked Questions
While I can’t be there to troubleshoot all your questions and problems as a community we can learn from each other.
Note from KØBSB: I am not going to be the general help desk for the Raspberry Pi, Raspian, or anything not directly connected to this article. Try a Google or other search engine to find your problem or error message, or go to stack exchange and ask them. I reserve the right to ignore any questions that in my Opinion do not apply directly to this series how to! Do not expect an email or call.
If you have a problem, or a question in assembling this particular HOTSPOT send an email to: [email protected]
Q: I try using Pi Finder “Terminal” button, the screen opens up, and tells me that it can’t connect. (Example: you get a message like, “Error: All configured authentication methods failed “) What am I doing wrong?
A: You are having an SSH Access problem. Check the following points:
Q: I keep forgetting to type sudo before all the commands. Isn’t there a simpler way?
A: Yes, but it is a bit dangerous. You could put the terminal session into administrator mode. Understand that in UNIX like systems Administrative or root mode has very little protections and you can seriously damage you system. For example, if you tell the system to delete a file(s) it will do so without question, including its own operating system essential files. In other words, if you don’t watch what you are doing in this mode very carefully, you can brick the system. If you want to easily enter root mode on the pi, simply type:
To exit root mode enter:
another way is to enter:
but that will require the root password.
Note: It’s probably a good thing to set the root password on the Raspberry Pi. It is not set initially and most people never set it. There are security considerations for this. If, however, you need to recover the disk drive during the boot sequence a program called fsck (the Linux version of ScanDisk) will ask for it. If you have not set a root password, you will not be able to proceed further and the only alternative is to re-write the µSD card with the last backup. Essentially you have a brick on your hands. For this reason I always set the root password and to something very secure. Please note that the error I have just described would not be visible as we have configured the DHAP as a headless system. To detect this error, you would need a monitor with HDMI input and a USB keyboard connected to the DHAP. I have such a setup at home, I just don’t take it traveling with me. The Raspberry Pi being so small and simple tends to make people thing it is not complex. Hook a HDMI monitor to the Raspberry Pi and watch the boot sequence, it is pretty complex, all the programs running in the background. But I digress…
To set the root password enter:
= = = = = = = = = = = = = = = = = = = = = = = = = = = = = = = = =
This concludes the 4 Part Series The $400 World Wide Mobile Me….
73,
Happy communicationg, and having fun with your new Hotspot!
de
Barry, K0BSB
This is Part 3 of a 4 Part Article.
Part 1 covers assembling the hardware
Part 2 covers provisioning the Raspberry Pi with Software
Part 3 covers Final Configuration of the hotspot
Part4 is Frequently Asked Questions
Everything if it has gone well is setup and should be running. To make sure that the system and software is initialized and synchronized at this point you should reboot the system. If you are using a Raspberry Pi Model 1 (any variant) instead it’s best to install the WiFi dongle. Model 1’s had only two USB ports rather than 4. The Model 1’s did not have as well designed power supply as the model 2, 3, or Zero, and so every time you put a device on the USB Bus it caused a power drop in the main supply bus which would cause the Model 1 to reboot. If you just pull the power on any Raspberry Pi it may cause a glitch during a file I/O and the OS is writing to the files any time it needs to, so you may not be aware. Pulling power abruptly may damage your µSD Card (Remember that is the Pi’s Disk Drive). While all it takes is to rewrite it again, you will lose any work between the last backup of the card.
The safest way is to shutdown the Model 1’s before putting any device on its USB Bus. This is best done as follows from the SSH console on your Laptop/Desktop:
If you are using a model 2 or a model Zero without WiFi, now is a good time to put in your WiFi Dongle.
If you are using a Model 2, 3, or Zero, from your SSH console on your Laptop/Desktop enter:
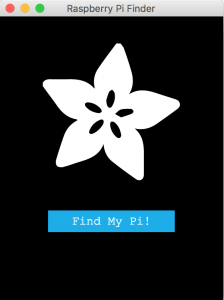
When the system reboots, this may take anywhere from 30-40 seconds to 2 minutes, go grab a cup of coffee and relax, we have done the hard parts. If you can’t wait watch the green activity light on the circuit board, not the RJ-45 Connector, when it stops flashing vigorously the system is mostly booted. The Pi Finder screen on your Laptop/Desktop should have reset to this:
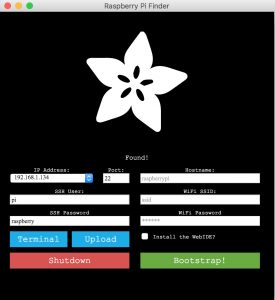
No need to open an terminal session, but you can if you want, just incase you have some tweaking to do. When the terminal window opens with the command prompt the system is booted. Or you can close the Pi Finder window it’s your choice.
Make sure the system you are now running on is still on the same network as the Raspberry Pi. Then open a browser and enter:
If a window opens go to the Configure the Pi-Star Hotspot Section. Otherwise:
If you get a server not found, or other error, you may not have the Bonjour software active on your the system you are trying to access the Raspberry Pi with.
On a windows machine, you can download Bonjour & Quicktime (Apple Computer’s system locator, MP4 Video Player) from for free from Apple.
A MacOS machine should have it already installed, IOS has had software functions since IOS 4.0, and Android since JellyBean 4.1, however, they may not be active. If that is the case a free app called Fing is available on both IOS and Google Play that will implement the nmap scan function and reveal the IP address of the pi-star server. Then you can access it as described with Angry IP Scanner below.
If you are on a Linux Machine it can be loaded with:
It was already installed on the Raspberry Pi when you pushed the Bootstrap Button. If you don’t want to install this software on your thin client machine, (makes life a bit easier, but not required) you will need to know the IP address of your pi-star server. A highly recommended utility for your Laptop/Desktop is a freeware graphical nmap derivative called Angry IP Scanner which will scan the local network you are on and report the IP Address of all devices it finds on the network. This can be very useful in trouble shooting your network. As mentioned above a similar piece of software called Fing will run on mobile devices. After you have determined the IP Address of the Pi-Star Server (computer) enter:
The default user name: pi-star
The default password: raspberry
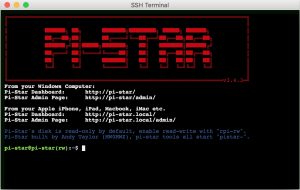
If you changed either of the above substitute your user name/password. After you have hit return on the local web address of the hotspot, the browser indicator will spin/flash for a short while, and then a window will open stating No Mode defined. If you don’t see that you have some sort of network problem, or the web server is not running. Ensure that both the system running the web browser and the Raspberry Pi are on the same network. If they are you may try rebooting the Raspberry Pi. If that still fails, there are so many possibilities, I can only reference you to the pi-star support pages located on Facebook and the Wiki. Failing that recheck the steps to this point to ensure you encountered no errors getting here. I will continue assuming everything is fine and your browser opens to the page shown below.
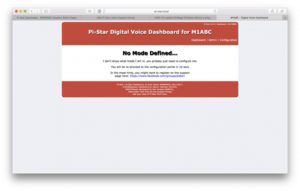
After 10 seconds or so, you will see the a page asking you to sign in. Use the appropriate username and password. After they are entered, the initial configuration page will open
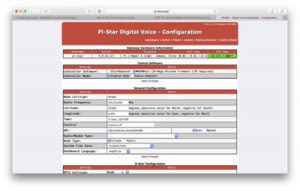
At the top of the page is the Pi-Star Banner, the broad red stripe. In the lower right corner of the banner are links to various functions in the program.

Select “Configuration”and the following page will open:
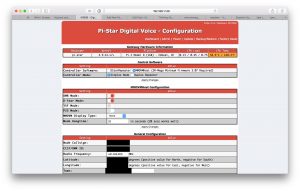
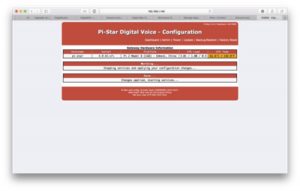
Begin configuring your hotspot Your choices may vary from the items below. It’s your HotSpot and your choices:
Page down (Most likely the form does not all fit on the screen)
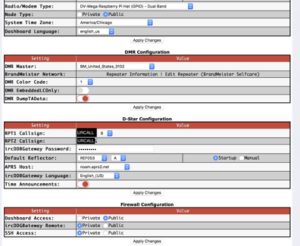
Now we need to set up the WiFi Connection.

. . . I am… Are You?
Continue to Part 4: Configuring the MMDVMHost Software Click Here
This is Part 2 of a 4 Part Article.
Part 1 covers assembling the hardware
Part 2 covers provisioning the Raspberry Pi with Software
Part 3 covers Final Configuration of the hotspot
Part4 is Frequently Asked Questions
Now that we have assembled the hardware parts necessary, it’s time to assemble the physical package. Next we have to load the software to run the Pi. I am not covering in detail physical assembly of the Mini DHAP. For the most part Hardened Power Systems (HPS) puts together the DHAP , and you only have to mount the circuit boards, and batteries. If you need assistance with your purchase Bill at HPS (931) 207-0079 has always been helpful, knowledgeable, and given good support.
When you are mounting the circuit boards HPS provides Stainless Hex Head Screws to mount them. Bill prefers them since it is much harder to strip the heads out. To assemble the DHAP you will need a 1/16th in Hex Key. Use proper techniques when handling the Raspberry Pi and DVMega Boards, so as not to impart a static charge and ruin the solid state components. Also watch tightening the screws that hold the boards in place, its only ABS Plastic, so as not to strip out the built in standoffs.
Lastly, pay close attention to mounting the DVMega onto the stake pins of the Raspberry Pi. The pins are easily bent, and straightening them out can result in breaking them off. Also watch alignment of the female header of the DVMega Board. It should attach to both rows starting at pin 1. I have seen a few people shift it down one pin placing the header starting on pins 3 & 4 instead of pins 1 & 2. It’s best to review the installation PDF published here before continuing. Note: If using the DHAP & RasPi2 or RasPi3 you will not need to glue a stand off to the board, HPS provides a mounting bracket.
The Raspberry Pi has anywhere from 256 MegaBytes to 1 Gigabyte of on board memory, but uses the SD card as its solid state disk drive. The older Raspberry Pi model 1, uses the Full size SD card while the Raspberry Pi Model 2 and later use µSD cards. The form factors are different, and the Mini DHAP requires the Model 2 or 3. You still can use a DV Mega card with the Model 1, just not the DHAP case, so this article will also cover setting up that configuration, but Power, Packaging, and Cooling (PP&C) are left as an exercise to the student.
In fact, If you want to create an even smaller package the Raspberry Pi Zero, or better yet the Raspberry Pi Zero with WiFi should also work well. These are actually single core versions of the latest four core Raspberry Pi3. I have thought about trying to create a version of the Pi-Star with a DVMega and a WiFi Pi Zero. Again PP&C are left as an exercise for the student.
This variant may only require two 18650’s as the Pi 2 board draws about 500 mA, the Pi 3 Draws about 700 mA, and the Pi Zero with WiFi draws about 120 mA at 5V. I would also suggest you add a Buck Converter to the power circuit if you intend to build one so you will need to provide 6.2 VDC to power the 5V Raspberry Pi’s. Note the Buck converters will generally handle 6-36VDC and give you a reliable, steady 5VDC output up to about 3A. Also you will need to put stake pins on the Pi Zero for GPIO bus, to mount the DVMega.
I will reiterate this further in the article, but most SD & µSD cards can be read an infinite number of times. However, any one memory location can only be written about 100,000 times before data loss will occur. Since the Pi’s use this type of memory as its disk drive you can count on them failing and the Raspberry Pi to act like it has suffered a disk failure. It’s really no big deal, since all you have to do is rewrite the same software onto the same card and you are back in business again. You can go through all the steps in this article, or simply read the completed file back into your computer as an .IMG file and not have to generate the software again. The .IMG file will generally be the size of the SD Card, so rather than take up the space on your disk, you may want to copy the .IMG file to a USB Thumbdrive for backup purposes.
I always said my friend Murphy was an optimist, so if the card is going to fail, it will do so in the field when you don’t have a laptop with you! To cover that eventuality I carry a second duplicate µSD card in it’s SD Carrier in keep it inside the DHAP case for an “in the field” backup. Also the Raspberry Pi 2’s have a spring powered eject for the µSD Cards. I have seen cases where they get bumped while the PI is powered up, and this can cause the data on the card to be ruined and need to be re-written again.
So with that caveat mentioned let’s generate an operating Raspberry Pi System.
For a multimode radio hotspot we will generate a Thin Client (Lite) version of MMDVMHost. A thin client uses a web server to control the hotspot, and only needs a web browser as the user or client terminal to access the hotspot. Thus, I can use my laptop, tablet, or phone for a screen, in fact, anything with a web browser.
Note: If you do not have your DHAP Assembled yet, or you are not planning on using one, you can still proceed with generating the system with a µSD Flash card, and a bare Raspberry Pi Board with or without the DVMega Board. If you don’t have a case for the Pi just be careful as not to cause any shorts until you can protect the bare board.
The computer you use to generate the code for the hot-spot can use any OS, however I use my Apple MacBook Retina (2016) and MacOS Sierra. However, you can use a Windows Machine (XP, Vista, Win7, Win8, or Win10), or Linux to generate the µSD Card. That said ,you can actually use a Raspberry Pi to generate the software for the hotspot to run on a raspberry pi, since the Raspberry Pi runs on a version of Linux.
The Computer is used to download the software onto the µSD card, and then prep the RasPi for use using SSH, so not much software is required on the prep machine. The Find My Pi Software referenced here will provide an SSH terminal for MacOS, Windows, and Linux users. However the initial setup process will vary depending what operating system you use. If you are using Windows or Linux, this article will assist you for the most part, but some specifics will be different. For those operating systems, there are plenty of articles on the Web to more than cover the slight differences if you get stuck. Just ask your favorite search engine for help.
Note: you will need a desktop or Laptop for this step, most tablet computers cannot do the µSD Card Prep. Once Pi-Star is running you can use a tablet or phone to configure it.
You may need a couple of cables temporarily for the next steps. An Ethernet cable, and a USB to µUSB to power the Pi (5VDC), or service power (117VAC) to 6-36 VDC with a 5mm x 2.1 mm Coaxial power connector.
A note about the Find My Pi Software. There is nothing magic about this software, it just makes the job of setting up the Pi so much easier. Prior to this software there was a long chain of software loads, that this does automatically. Additionally it will put a couple of additional programs on your Pi. It loads some development software, which may be useful in the future if you want to add some additional functions such as a display, or searching logs, etc. It loads a piece of software originally developed by Apple, called Bonjour, that allows you to access your Pi by <computer name>.local as opposed to having to find it by IP address. It loads a some software originally developed by Microsoft, called SAMBA, that allows you to access the Pi’s Disk drive from another computer on the network as a network mounted drive.
Lastly it loads a piece of software developed by AdaFruit Company called Occidentalis. The name Occidentalis is a variety of a black raspberry. The software uses a file on the boot partition (occidentalis.txt) that contains the host name, the WiFi SSID, and the WiFi Password, and sets them up when the Raspberry Pi is booted. A disk that the Raspberry Pi uses is partitioned into two formats. A linux format, and the boot partition which is written in the FAT format. A FAT formatted drive is readable by almost any computer (Most Thumb drives use this format.) While putting SSID and it’s password in an unsecured text file on the disk is a major breach of security it is convenient for headless versions of the Pi, as it allows easy switching of the WiFi (at Home, In your Mobile, Your cell phone or other mobile hotspot, or the local coffee shop) depending on operating location. If you want to remove this security flaw, a simple one line command will remove it. It’s documented below, and it’s use is optional as to the user’s preference.
Filesystem Size Used Avail Use% Mounted on
/dev/root 1.7G 1.2G 389M 76% /
devtmpfs 481M 0 481M 0% /dev
…
(extraneous display deleted)
resize2fs 1.43.3 (04-Sep-2016)
Filesystem at /dev/mmcblk0p2 is mounted on /; on-line resizing required
old_desc_blocks = 1, new_desc_blocks = 1
The filesystem on /dev/mmcblk0p2 is now 1892608 (4k) blocks long.
Filesystem Size Used Avail Use% Mounted on
/dev/root 7.1G 1.3G 5.6G 19% /
devtmpfs 481M 0 481M 0% /dev
…
(extraneous display deleted)
sudo apt-get remove <program> at the command prompt
Update the DVMega Firmware (Optional if Greater than 3.07) You can find an article to set your Pi up to flash the DVMega Firmware by adding a wire to the board. Note: this will void your DVMega Warranty so solder carefully! It’s documented here:
https://g0wfv.wordpress.com/how-to-update-dvmega-firmware-without-a-programmer-or-an-arduino/
After you have made the hardware changes the following steps will setup the pi to update the firmware, and then actually do it.
Your Raspberry Pi system is now generated. Now would be a good time to power off the Pi, remove the SD Card and copy the system as an .IMG File using what ever Software you used to create the SD card in the first place. If you capture the image of the card, it will be the size of the card. This will be a lot of wasted space, since the actual disk used is between 2 and 4 GB. I recommend use a thumb drive to hold the image rather than your disk drive. Now is also a good time to copy that image on the second SD card you may have purchased as a backup incase the operating card gets clobbered/over written too many times.
The next section will cover the setup of the MMDVMHost for radio operation. We are almost there, and the next steps are easy.
Continue to Part 3: Configuring the MMDVMHost Software Click Here
73’s
Barry, K0BSB
– – – – – – – – – – – – – – – – – – – – – – – – – – – – – – – – – –
[1] https://cdn-learn.adafruit.com/downloads/pdf/the-adafruit-raspberry-pi-finder.pdf
[2] https://github.com/adafruit/Adafruit-Pi-Finder/releases/tag/3.0.0
[3] https://www.tweaking4all.com/software/macosx-software/macosx-apple-pi-baker/
[4] https://www.tweaking4all.com/?wpfb_dl=94
This is Part 1 of a 4 Part Article.
Part 1 covers assembling the hardware
Part 2 covers provisioning the Raspberry Pi with Software
Part 3 covers Final Configuration of the hotspot
Part4 is Frequently Asked Questions
A fully equipped Mini-Mega for about $300 and a DMR HT Radio for about $100 and you are ready, set, GO…
A very portable mobile rig capable of working the world, and very transportable, Even through TSA. If they object show them the LiON Batteries which you can’t pack. It’s worked for me.
I like taking my ham radio with me wherever I travel, by plane, train, or driving. I love letting the civilians marvel at the ease of making contacts halfway around the world, or even several hundred miles away with a nice clear signal. Have them chat with someone settling down for an after dinner drink in England, or chatting with someone fishing off the pier in Australia. I just hand them the speaker mike and let them go, after all I am still the control operator with my HT firmly in my grip. Note: If you operate outside the US be sure to register with the country whose boarders you are operating in, including the nation of registry of the cruise ship you are operating from, and get the captain’s permission as well. It’s a great recruiting tool for Amateur Radio.
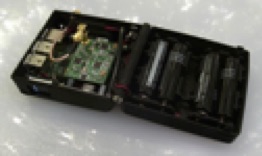
This is the Mini-DHAP opened so you can see its innards:
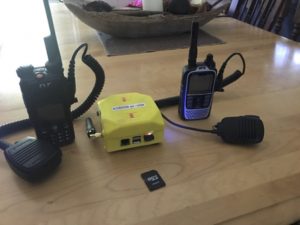
Here is the Mini-DHAP in travel operating mode for both DMR and D-Star. Not shown is my Cell Phone which I use as the Hotspot and as a console for the Mini-DHAP running web based Pi-Star.
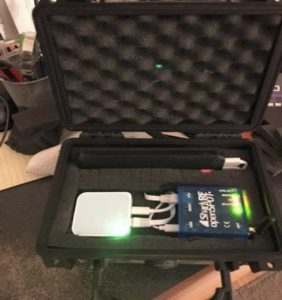
This is a Shark OpenSpot setup in Operating Travel Mode, a Brief case rather than a Grab ‘n Go.
So why this stuff rather than using the Shark RF Open Spot. The cost is about the same. Well I find it more flexible, if you have some parts laying around, like an older Raspberry Pi you can put it back to work. Also the Mini DHAP is a much smaller package by the time you add power, Wifi, and other stuff. Also, you may need to bring a laptop to change configuration in the field, I can use my phone for the MiniMega DHAP.
Packing a lot of gear, like I was going on a DXpedition is not my idea of fun though. Besides the comments I get from the XYL about why I need that all that Junk, especially when I remind her that luggage is generally restricted to about 50 pounds.
Packing my Toys for travel, I am down to:
If I want to operate for more than a day add:
The whole thing fits in a trim cross body messenger bag with my Laptop, or a side pocket in my DSLR camera bag. No Muss, No Fuss! My only outside dependency is either a WiFi Connection, or a Good LTE hotspot connection to the internet is available.
You can get many of parts from GigaParts including the Raspberry Pi, the DV Mega, Memory card, and Hardened Power Case. It’s more expensive that way, but you will get all the pieces together shipped to you. However the cost will be about $370, slightly more than the price of the basic SharkRF OpenSpot, but you still have to add the cost of WiFi, an internet source, power etc.
However if you purchase the pieces from various vendors you can save some dollars and a bit of hassle (read that as: get out the soldering iron!). I have included a lot of links to Amazon, It’s where I got a lot of my stuff, however that is not the only source, and the least expensive price. Prices and availability were at the time I wrote the article, YMMV.
If you have to purchase everything the total is about $305 complete for all the parts, including Batteries and chargers, portable 12V power, antenna, and $316 with optional Power Pole Cable. You may not want some of the accessories, or have stuff laying around in your junk drawer which will save additional funds.
Note: I had older DVMega which needed the firmware updates to work with Brandmeister instead of just D-STAR. To upload the firmware into the DVMega requires an extra step, and a patch to the DVMega Board adding a wire from the Flash Memory Write enable to an unused GPIO pin (GPIO4 pin 7 of the RPI Bus). If you order the DVMega from the link provided they will solder the wire to the board for you if you check the option box (at no additional cost).
Continue to Part 2: Programming the Raspberry Pi Click Here
73’s
Barry, K0BSB
– – – – – – – – – – – – – – – – – – – – – – – – – – – – – – – – – –
[1] I use this $18.99 @ Amazon
https://www.amazon.com/EasyAcc-Ultra-Slim-External-PortableSmartphone/dp/B00ZWUZG70/ref=sr_1_1?s=wireless&ie=UTF8&qid=1502630020&sr=11&keywords=EasyAcc+6000+mAh
but this one by PowerJuice has captured my interest for $19.99
https://www.amazon.com/Black-Mini-Portable-Charger-Built/dp/B0742NKSBM/ref=sr_1_1?ie=UTF8&qid=1502629900&sr=8-1&keywords=power+brick+6000+mAh
[2] http://www.microcenter.com
[3] http://www.combitronics.nl/index.php?route=product/product&path=61&product_id=68
[4] http://www.combitronics.nl/index.php?route=product/product&path=61&product_id=69
[5] https://www.portableuniversalpower.com/our-products/ham-radio-power/dhap-mini-mega/
[6]https://www.amazon.com/Retevis-Antenna-144MHz-430MHz-Baofeng/dp/B010V7D8KK/ref=sr_1_5?ie=UTF8&qid=1502573516&sr=8-5&keywords=Retevis+RT20
[7]https://www.amazon.com/Bundle-Digicharger-Universal-Rechargeable-Batteries/dp/B00KW2ZDHQ/ref=sr_1_5?s=hpc&ie=UTF8&qid=1429895585&sr=1-5&keywords=18650+charger
[8]https://www.amazon.com/DULEX-2200mAh-Rechargeable-Lithium-Ion-Batteries/dp/B01NCS34G4/ref=sr_1_3?ie=UTF8&qid=1491865916&sr=8-3&keywords=dulex+18650
[9]https://www.amazon.com/Amamax®-Wall-Adapter-Power-Supply/dp/B00KZ2ZQE8/ref=sr_1_4?s=electronics&ie=UTF8&qid=1429895362&sr=1-4&keywords=AC+wall+wart%2C+dc+5.5+x+2.1
[10] http://www.westmountainradio.com/product_info.php?products_id=ppl-18
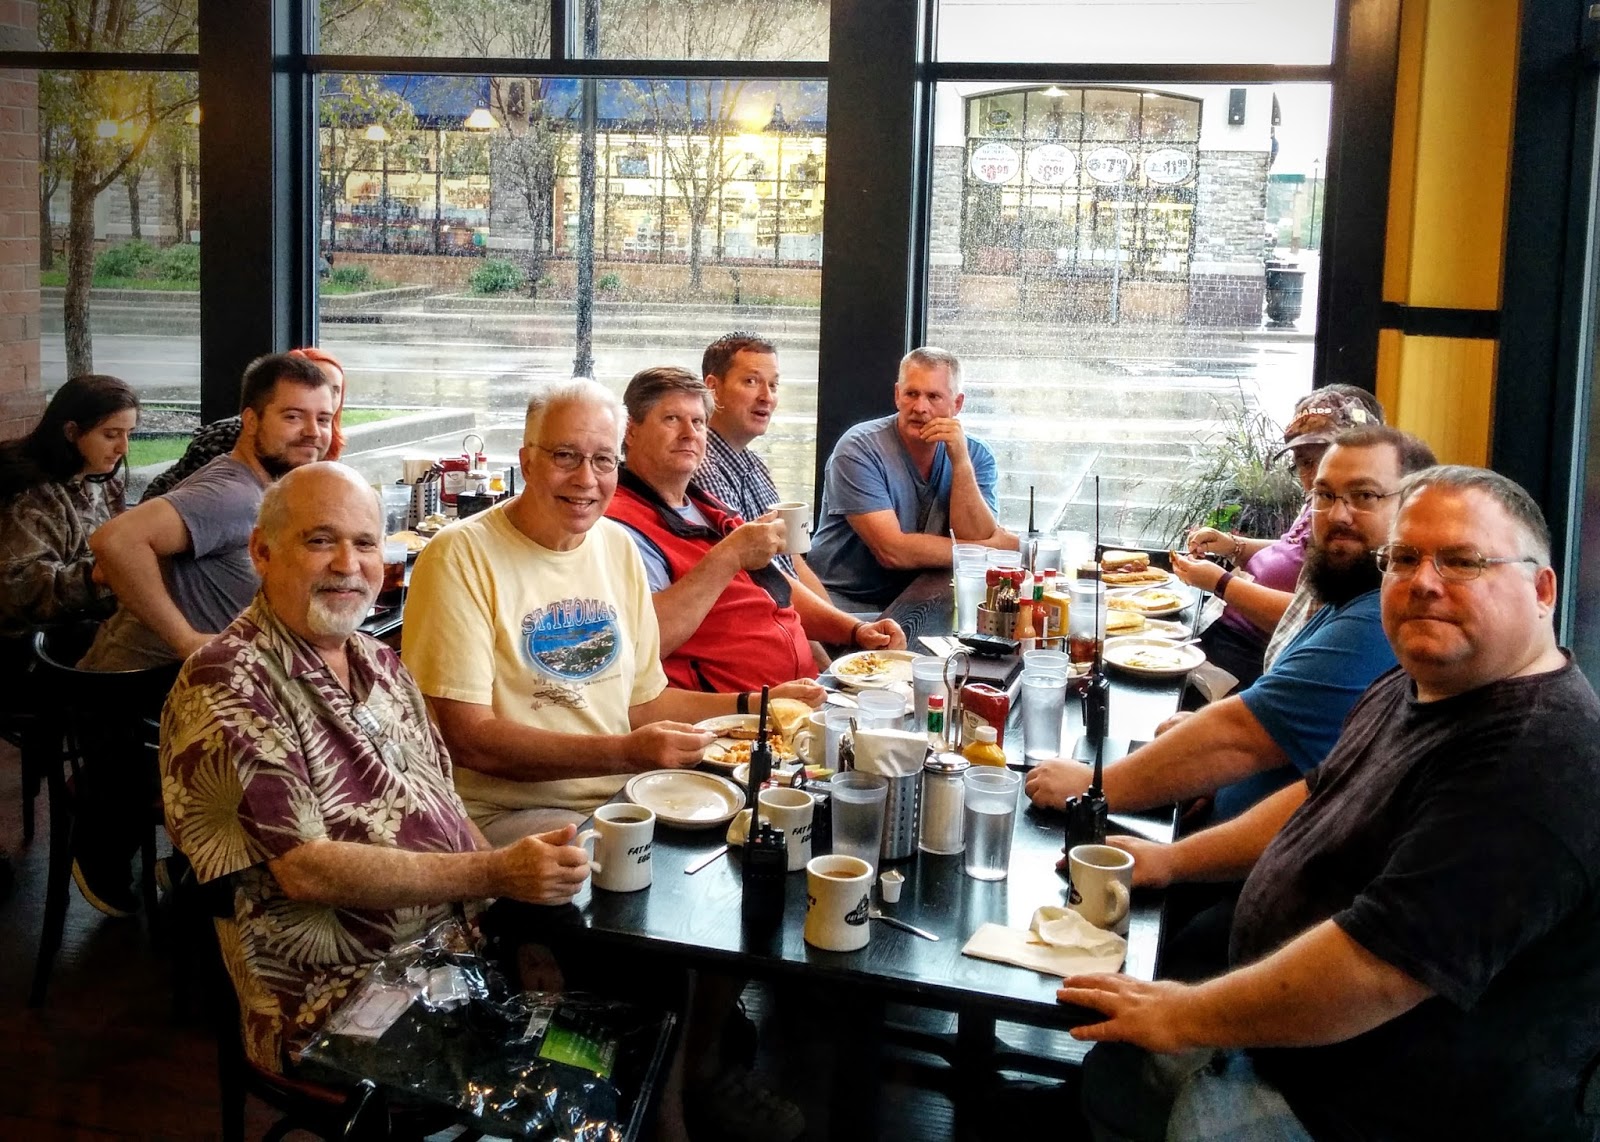
Hello from your host’s Dave – KE0NA and John KA0KMJ
It’s been another two weeks, so it’s time to get together at Fat Nat’s Eggs in St. Anthony Village for DMR breakfast!
Enjoy some delicious food, get your DMR questions answered, arrange to have a code plug loaded onto your radio.
It’s the best way to catch up on the dynamic world of DMR in Minnesota while socializing with a friendly group of guys and gals.
The earlier birds will be there at 7:30 AM (or even earlier) but the official start time is 8:00 AM.