This is Part 2 of a 4 Part Article.
Part 1 covers assembling the hardware
Part 2 covers provisioning the Raspberry Pi with Software
Part 3 covers Final Configuration of the hotspot
Part4 is Frequently Asked Questions
Getting Started
Now that we have assembled the hardware parts necessary, it’s time to assemble the physical package. Next we have to load the software to run the Pi. I am not covering in detail physical assembly of the Mini DHAP. For the most part Hardened Power Systems (HPS) puts together the DHAP , and you only have to mount the circuit boards, and batteries. If you need assistance with your purchase Bill at HPS (931) 207-0079 has always been helpful, knowledgeable, and given good support.
When you are mounting the circuit boards HPS provides Stainless Hex Head Screws to mount them. Bill prefers them since it is much harder to strip the heads out. To assemble the DHAP you will need a 1/16th in Hex Key. Use proper techniques when handling the Raspberry Pi and DVMega Boards, so as not to impart a static charge and ruin the solid state components. Also watch tightening the screws that hold the boards in place, its only ABS Plastic, so as not to strip out the built in standoffs.
Lastly, pay close attention to mounting the DVMega onto the stake pins of the Raspberry Pi. The pins are easily bent, and straightening them out can result in breaking them off. Also watch alignment of the female header of the DVMega Board. It should attach to both rows starting at pin 1. I have seen a few people shift it down one pin placing the header starting on pins 3 & 4 instead of pins 1 & 2. It’s best to review the installation PDF published here before continuing. Note: If using the DHAP & RasPi2 or RasPi3 you will not need to glue a stand off to the board, HPS provides a mounting bracket.
The Raspberry Pi has anywhere from 256 MegaBytes to 1 Gigabyte of on board memory, but uses the SD card as its solid state disk drive. The older Raspberry Pi model 1, uses the Full size SD card while the Raspberry Pi Model 2 and later use µSD cards. The form factors are different, and the Mini DHAP requires the Model 2 or 3. You still can use a DV Mega card with the Model 1, just not the DHAP case, so this article will also cover setting up that configuration, but Power, Packaging, and Cooling (PP&C) are left as an exercise to the student.
In fact, If you want to create an even smaller package the Raspberry Pi Zero, or better yet the Raspberry Pi Zero with WiFi should also work well. These are actually single core versions of the latest four core Raspberry Pi3. I have thought about trying to create a version of the Pi-Star with a DVMega and a WiFi Pi Zero. Again PP&C are left as an exercise for the student.
This variant may only require two 18650’s as the Pi 2 board draws about 500 mA, the Pi 3 Draws about 700 mA, and the Pi Zero with WiFi draws about 120 mA at 5V. I would also suggest you add a Buck Converter to the power circuit if you intend to build one so you will need to provide 6.2 VDC to power the 5V Raspberry Pi’s. Note the Buck converters will generally handle 6-36VDC and give you a reliable, steady 5VDC output up to about 3A. Also you will need to put stake pins on the Pi Zero for GPIO bus, to mount the DVMega.
I will reiterate this further in the article, but most SD & µSD cards can be read an infinite number of times. However, any one memory location can only be written about 100,000 times before data loss will occur. Since the Pi’s use this type of memory as its disk drive you can count on them failing and the Raspberry Pi to act like it has suffered a disk failure. It’s really no big deal, since all you have to do is rewrite the same software onto the same card and you are back in business again. You can go through all the steps in this article, or simply read the completed file back into your computer as an .IMG file and not have to generate the software again. The .IMG file will generally be the size of the SD Card, so rather than take up the space on your disk, you may want to copy the .IMG file to a USB Thumbdrive for backup purposes.
I always said my friend Murphy was an optimist, so if the card is going to fail, it will do so in the field when you don’t have a laptop with you! To cover that eventuality I carry a second duplicate µSD card in it’s SD Carrier in keep it inside the DHAP case for an “in the field” backup. Also the Raspberry Pi 2’s have a spring powered eject for the µSD Cards. I have seen cases where they get bumped while the PI is powered up, and this can cause the data on the card to be ruined and need to be re-written again.
So with that caveat mentioned let’s generate an operating Raspberry Pi System.
Prep the Memory Card
For a multimode radio hotspot we will generate a Thin Client (Lite) version of MMDVMHost. A thin client uses a web server to control the hotspot, and only needs a web browser as the user or client terminal to access the hotspot. Thus, I can use my laptop, tablet, or phone for a screen, in fact, anything with a web browser.
Note: If you do not have your DHAP Assembled yet, or you are not planning on using one, you can still proceed with generating the system with a µSD Flash card, and a bare Raspberry Pi Board with or without the DVMega Board. If you don’t have a case for the Pi just be careful as not to cause any shorts until you can protect the bare board.
The computer you use to generate the code for the hot-spot can use any OS, however I use my Apple MacBook Retina (2016) and MacOS Sierra. However, you can use a Windows Machine (XP, Vista, Win7, Win8, or Win10), or Linux to generate the µSD Card. That said ,you can actually use a Raspberry Pi to generate the software for the hotspot to run on a raspberry pi, since the Raspberry Pi runs on a version of Linux.
The Computer is used to download the software onto the µSD card, and then prep the RasPi for use using SSH, so not much software is required on the prep machine. The Find My Pi Software referenced here will provide an SSH terminal for MacOS, Windows, and Linux users. However the initial setup process will vary depending what operating system you use. If you are using Windows or Linux, this article will assist you for the most part, but some specifics will be different. For those operating systems, there are plenty of articles on the Web to more than cover the slight differences if you get stuck. Just ask your favorite search engine for help.
Note: you will need a desktop or Laptop for this step, most tablet computers cannot do the µSD Card Prep. Once Pi-Star is running you can use a tablet or phone to configure it.
- Download the AdaFruit Raspberry Pi Finder Document[1] and Software[2] as outlined in the documentation for your Operating System, and install the Pi Finder for your operating system on your computer.
- For MacOS Users: Transferring the Pi Software to the µSD card used to be a real pain, until I found a Great MacOS program called Apple Pi Baker[3] by Hans at Tweaking4All. For free software he offers incredible support. He also makes some other great utilities, so you may want to surf his site for other MacOS Utilities. Scroll down to the most recent version section to get the download[4] (v1.9.2 at the time of this writing)
- First download Pi-Star onto your computer[5] from MW0MWZ’s site. You can also use the MMDVMHost Application or Blue DV Application consult the BrandMeister DVMega Page[6] for information. Setting the latter applications up on your Pi is “… an exercise left to the student.”
- Pick the latest version zip file for the Raspberry Pi.
- I am using Pi-Star_RPi_V3.4.3_09-Aug-2017.zip in this article
- UnZip the file, if necessary (MacOS does this Automatically) and note where the unzipped file is stored.
- If you are not using MacOS follow the instructions for the Windows or Linux Imaging Guide below the downloads section on the MW0MWZ site, and then go to the setup your Raspberry Pi section below.
- If you are using MacOS
- write the Pi-Star Image onto the µSD card you are using, with Apple Pi Baker
- Download Apple Pi Baker DMG file on to you system.
- Right click the file, and select open button (Tweaking 4 All is not a Registered Apple Developer, but his software is safe)
- Close the software, mount your µSD Card and restart Apple Pi Baker.
- Enter your administrator’s password
- Highlight the µSD card in the drives area, If you don’t see the µSD card mounted, click the small refresh button on the upper right hand corner of the box. Select the µSD card, you want to write to. (Make sure you select the correct “disk” or you could nuke your MacOS Disk! — Check the size it would be a µSD Card size like 8 or 16 GB NOT 128/256 GB disk size!)
- select the Prep for NOOBS button this will reformat your µSD card for the Pi. Again make sure the correct “disk” is selected, there is no turning back after you select Prep for NOOBS.
- After the card is formatted properly according to SD Foundation Standards.
- On the right side of the Window (Pi ingredients box) is a small button with three dots, select it.
- A window will open to select the .img file you will write to the µSD card.
- Navigate to where the unzipped pi-star image is on your system and select it.
- Then select Restore Backup
- When ApplePi Baker finishes writing your µSD card it will eject the card. Remove it from your system
Set up your Raspberry Pi
You may need a couple of cables temporarily for the next steps. An Ethernet cable, and a USB to µUSB to power the Pi (5VDC), or service power (117VAC) to 6-36 VDC with a 5mm x 2.1 mm Coaxial power connector.
A note about the Find My Pi Software. There is nothing magic about this software, it just makes the job of setting up the Pi so much easier. Prior to this software there was a long chain of software loads, that this does automatically. Additionally it will put a couple of additional programs on your Pi. It loads some development software, which may be useful in the future if you want to add some additional functions such as a display, or searching logs, etc. It loads a piece of software originally developed by Apple, called Bonjour, that allows you to access your Pi by <computer name>.local as opposed to having to find it by IP address. It loads a some software originally developed by Microsoft, called SAMBA, that allows you to access the Pi’s Disk drive from another computer on the network as a network mounted drive.
Lastly it loads a piece of software developed by AdaFruit Company called Occidentalis. The name Occidentalis is a variety of a black raspberry. The software uses a file on the boot partition (occidentalis.txt) that contains the host name, the WiFi SSID, and the WiFi Password, and sets them up when the Raspberry Pi is booted. A disk that the Raspberry Pi uses is partitioned into two formats. A linux format, and the boot partition which is written in the FAT format. A FAT formatted drive is readable by almost any computer (Most Thumb drives use this format.) While putting SSID and it’s password in an unsecured text file on the disk is a major breach of security it is convenient for headless versions of the Pi, as it allows easy switching of the WiFi (at Home, In your Mobile, Your cell phone or other mobile hotspot, or the local coffee shop) depending on operating location. If you want to remove this security flaw, a simple one line command will remove it. It’s documented below, and it’s use is optional as to the user’s preference.
- Make sure that your Pi is powered off. Inserting or Removing the µSD card (The Pi’s Disk Drive with power on may destroy the data on it.)
- Note: µSD cards are only good for about 100,000 writes. They can be read an infinite number of times, but writes will eventually cause the card to be unreadable. At the end of this process we will make a backup to carry in the DHAP case. Just in case! 🙂
- before you remove the µSD card from your computer find it mounted on you computer. You may need to mount it, but you will see only a small drive mounted called “boot”. Before placing this SD Card into the Raspberry Pi you need to create a file called “ssh” with no extension, or quotes.
- On a Mac or linux machine simply open a terminal window and type the following command
- sudo touch /Volumes/boot/ssh
- On a Windows machine just mount the drive and use a text editor to create an empty file. You may have to rename the file to remove an extension from the editor.
- Then eject the drive and continue
- On a Mac or linux machine simply open a terminal window and type the following command
- Put the prepared µSD card with Pi-Star on it into the rear Memory card slot. It will only fit one way (The gold fingers should be up). I am using an 8GB µSD card which is big enough for this function. Use more or less as you see fit, but at least 4GB.
- Connect the Ethernet cable to the RJ45 Jack on the Pi and the other end to an empty RJ45 Jack on your internet router. We will be doing a lot of downloading on the Pi setting it up, and this is the easiest way. If you have to remove a device from the router because you have all the jacks used, this will be temporary for about an hour or so.
- If you choose not to use the ethernet connection, you can set up the Raspberry Pi to connect to WiFi on boot. However, it takes a lot of extra steps to connect a cold Raspberry Pi to WiFi and the process is not straight forward. Fortunately, it is well documented on the web, but you will need to have a keyboard, and a monitor most likely with an HDMI input.
- Connect µUSB connector to the RasPi (left side as you look at the front, or the 117VAC DHAP Adaptor to power the PI. You could also use the 18650 LiON Batteries to power the Pi just make sure they are fully charged.
- If using the DHAP turn the power switch on.
- The rear Red led will go on, and the rear Green led will flash. wait until the Pi RJ45 connector shows both Yellow and Green leds. It’s okay if the green is flashing, but wait until the rear green light somewhat quiesses.
- Go to the Find my Pi application you down loaded earlier, and open the program. You will see the image below.
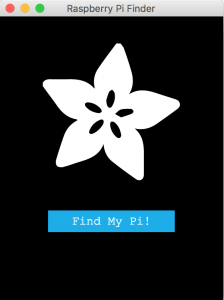
- Push the Find My Pi Button when the program opens.
- When the program finds a Raspberry Pi, the Main screen will open.
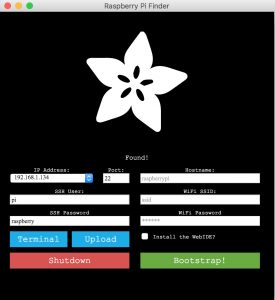
- select the ip address of the pi from the pull down on the first line. If you have only one Pi on your network it will select it for you.
- Enter pi-star for the user id, and raspberry for the password.
- select Terminal, a SSH terminal should open for you on your computer’s screen.
- If you get an authentication error, check that the correct ip address is selected and pi-star is the user-id, and that you created the ssh file on the boot partition
- You should see a screen somewhat like below:
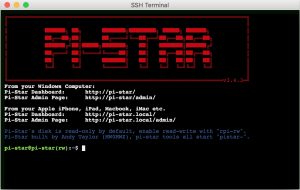
- Enter the following commands at the command prompt.
- pi-star@pi-star(ro):~$ rpi-rw <==Change to Read Write mode
- pi-star@pi-star(rw):~$ sudo bash <==SU to root mode
- root@pi-star(rw):pi-star# df -h <==See Disk Size — 1.7G on an 8G drive
Filesystem Size Used Avail Use% Mounted on
/dev/root 1.7G 1.2G 389M 76% /
devtmpfs 481M 0 481M 0% /dev
…
(extraneous display deleted)
- If /dev/root size is approximately equal to µSD card size skip to Bootstrap Section, otherwise we need to resize the disk partition.
- root@pi-star(rw):pi-star# resize2fs /dev/mmcblk0p2
resize2fs 1.43.3 (04-Sep-2016)
Filesystem at /dev/mmcblk0p2 is mounted on /; on-line resizing required
old_desc_blocks = 1, new_desc_blocks = 1
The filesystem on /dev/mmcblk0p2 is now 1892608 (4k) blocks long.
- root@pi-star(rw):pi-star# df -h
Filesystem Size Used Avail Use% Mounted on
/dev/root 7.1G 1.3G 5.6G 19% /
devtmpfs 481M 0 481M 0% /dev
…
(extraneous display deleted)
- reboot (wait a few moments and the Main Screen will reopen)
- We will be installing some helper programs which will make the hotspot easier to use. If you see something you don’t like you can remove it by entering
sudo apt-get remove <program> at the command prompt
- One of the programs we will add is called Occidentalis, a program that on boot will setup your WiFi to the RasPi for you. It uses a file in the /boot partition of the µSD card which is formatted as a FAT32 partition. This means that you can access this partition with your laptop/desktop and edit the file on that machine to change wifi access points easily. The text file to edit is called occidentalis.txt, and is explained in the Find My Pi documentation you downloaded.
- Set up the Occidentalis defaults:
- Enter pi-star for the hostname
- Enter <Your WiFi SSID>
- Enter <Your WiFi Password>
- select the terminal button
- at the command prompt enter rpi-rw to put the disk in write mode
- close the terminal window
- Now select the Bootstrap Button
- this will take a few minutes while software is being loaded on your pi.
- it will also update the software library catalog and update the software to latest released versions
- select the terminal button again to get an open ssh screen
- This is the potential security breach I mentioned at the start of the article. If you want to seal it (I find the convenience factor worth the limited risk personally). You may want to let Occidentalis set your system up to use a specific WiFi and identify itself by host name (I use K0BSB_Pi-Star) and then allow the system to be installed and run through at least one reboot. After it has set everything up, then remove the software and .txt file. as shown below:
- At the command prompt enter:
- sudo apt-get remove occi -y
- sudo rm -f /boot/occidentalis.txt
- this will effectively remove occidentalis from your system.
- At the command prompt enter:
- because of the way that pi-star sets things up we need to re-run some installs at the command prompt enter
- sudo apt-get install -y node hfsprogs
- Samba is installed to allow you when your pi connected to your network to see it as a remote disk and transfer files easily without having to use thumb drives or other means.
- now restart Samba by entering sudo /etc/init.d/samba restart
- You may be done now, or maybe not!
- If you have a Raspberry Pi B, B+, or Raspberry Pi 2 Running Raspian Wheezy you do not have to repoint or disable the Bluetooth.
- If you are running Raspian Jessie on the above hardware perform the steps below to ensure the GPIO Serial Port is enabled
- If you are running an older version of the DVMega Pi Hats, and they are running firmware 3.07 or earlier you will need to flash the latest firmware (3.14 and it is stable at the time of this writing) to the cards. Note: this will void your warranty, and I take no responsibility for the results you get. But Hey! It won’t work anyways so what have you got to lose. I think you can send the cards back to Guus van Dooren ( dvmega@auria.nl ) read about it here
- If you have the single band DVMega you can:
- remove the Arduino UNO from the board, and Flash it using a Arduino Development kit as described in this YouTube Video
- If you have the dual band radio, or want to future proof either radio to allow easy flashing of the DVMega directly on the Pi, you are not done yet. Continue on.
- If you have the single band DVMega you can:
- If you are using a Raspberry Pi3 you need to disable or repoint the Bluetooth software. This may be already done in the software you are using, Verify that these changes are made.
- For those that want to understand what’s going on
- For those that want to just get on with it perform the following:
- First enable the GPIO Serial Port
- sudo nano /boot/config.txt
- add the following to the end of the file:
- enable_uart=1
- First enable the GPIO Serial Port
Prep the Pi to Flash the DVMega Firmware (Optional)
Update the DVMega Firmware (Optional if Greater than 3.07) You can find an article to set your Pi up to flash the DVMega Firmware by adding a wire to the board. Note: this will void your DVMega Warranty so solder carefully! It’s documented here:
HOW-TO Update DVMega firmware without a programmer or an Arduino
After you have made the hardware changes the following steps will setup the pi to update the firmware, and then actually do it.
- Ensure you can update DVMega Firmware loading the following systems software
- sudo apt-get install git avrdude python-dev python-rpi.gpio
- git clone https://github.com/openenergymonitor/avrdude-rpi.git
- cd avrdude-rpi
- sudo cp autoreset /usr/bin
- sudo cp avrdude-autoreset /usr/bin
- sudo mv /usr/bin/avrdude /usr/bin/avrdude-original
- sudo ln -s /usr/bin/avrdude-autoreset /usr/bin/avrdude
- Update the operating software and Firmware of your Raspi and clean up the queues
- cd
- sudo apt-get install rpi-update
- sudo apt-get upgrade -y && sudo apt-get dist-upgrade -y
- sudo apt-get autoremove -y
- sudo rpi-update
- sudo reboot
- when the system reboots, you should be able to see the pi-star system on your shared network drives. You can copy the DVMega Firmware updates over this way as well.
- Update the DVMega with the latest firmware it needs it (Must be 3.07 or later) with the wire mod installed
Flash the DVMega Firmware (If older then 3.07)
- get the address of the latest DVMega Firmware here and copy link of the firmware (ususally by right clicking) for the raspberry pi single/dual radios
(i.e. http://www.dvmega.auria.nl/images/DVMEGA_RH_V314_UNO.zip) - Open the SSH terminal on the RasPi again, and download the DVMega Firmware.
- rpi-rw
- mkdir DVMega
- cd DVMega
- wget <Filename copied from DVMega>
ex: wget http://www.dvmega.auria.nl/images/DVMEGA_RH_V314_UNO.zip - unzip *.zip
- Now flash the DVMega
- avrdude -p m328p -c arduino -P /dev/ttyAMA0 -b 115200 -F -U flash:w:<filename> -v
- sudo reboot
Your Raspberry Pi system is now generated. Now would be a good time to power off the Pi, remove the SD Card and copy the system as an .IMG File using what ever Software you used to create the SD card in the first place. If you capture the image of the card, it will be the size of the card. This will be a lot of wasted space, since the actual disk used is between 2 and 4 GB. I recommend use a thumb drive to hold the image rather than your disk drive. Now is also a good time to copy that image on the second SD card you may have purchased as a backup incase the operating card gets clobbered/over written too many times.
The next section will cover the setup of the MMDVMHost for radio operation. We are almost there, and the next steps are easy.
Continue to Part 3: Configuring the MMDVMHost Software Click Here
73’s
Barry, K0BSB
Links Below to help you find software:
– – – – – – – – – – – – – – – – – – – – – – – – – – – – – – – – – –
[1] https://cdn-learn.adafruit.com/downloads/pdf/the-adafruit-raspberry-pi-finder.pdf
[2] https://github.com/adafruit/Adafruit-Pi-Finder/releases/tag/3.0.0
[3] https://www.tweaking4all.com/software/macosx-software/macosx-apple-pi-baker/
[4] https://www.tweaking4all.com/?wpfb_dl=94